Kubernetes on Amazon EKS service
All about EKS service setup

Skilled DevOps Engineer with hands-on experience supporting, automating, and optimizing mission critical deployments in AWS, leveraging configuration management, CI/CD, and DevOps processes.
In this blog, I am going to cover the Kubernetes service by Amazon on AWS. K8s is an open-source platform for managing containerized workloads and services. Kubernetes takes care of scaling and failover for your application running on the container.
Kubernetes Cluster is used to deploy containerized applications on the cloud. Kubernetes uses the same underlying infrastructure, OS and Container.
Overview of Amazon EKS:
Amazon EKS is a managed service that is used to run Kubernetes on AWS. Using EKS users don't have to maintain a Kubernetes control plane on their own. It is used to automate the deployment, scaling, and maintenance of the containerized application. It works with most Operating Systems.
EKS is integrated with various AWS services;
-> ECR (Elastic Container registry) for Container Images.
-> Elastic Load Balancer for distributing traffic.
-> IAM for providing authentication and authorization.
-> VPC (virtual Private Cloud) for isolating the resources.
Amazon EKS Components;

1) Nodes: A node is a physical or virtual machine. In EKS both master Node and Worker Node are managed by the EKS. There are two types of Nodes.
Master Nodes: A Master Node is a collection of components like storage, Controller, Scheduler, and API server that makes up the control plane of Kubernetes. The EKS itself creates the Master Node and Manages it.
API Servers: It controls the API servers whether it is kubectl (Kubernetes CLI) or rest API.
etcd: It is a highly available key-value store that is distributed among the Kubernetes cluster to store configuration data.
Controller Manager: Cloud Controller Manager is used to manage the VMs, Storage, databases and other resources associated with the Kubernetes Cluster. It makes sure that you are using as much as the container needed at a point in time. It keeps a count of containers used and also records the state.
Scheduler: It validates what and when the work needs to be done. It integrates with the Controller manager and API servers.
Worker Nodes: The worker nodes in a cluster are the machines or physical servers that run your applications. The user is responsible for creating and managing worker nodes.
Kubelet: It controls the flow to and fro from the API. It makes sure containers are running in the pod.
Kubeproxy: It includes networking rules and access control. it is like a firewall.

Pods: A group of containers is called pods. They share networking, storage, IP address and port spaces.
Daemon Set: It makes sure that all node runs a copy of a certain pod. It is like a monitoring tool.
Master Nodes or Control Plane
Worker Nodes run on the Amazon EC2 instances in the Virtual Private cloud controlled by the organization. A cluster of worker nodes runs an organization's containers while the control plane manages and monitors when and where containers are started.
Worker Nodes or Data Plane
Worker Nodes run on the Amazon EC2 instances in the Virtual private cloud Controlled by the Organisation. A cluster of worker Nodes runs an Organisations Containers while the control plane manages and monitors when and where containers are started.

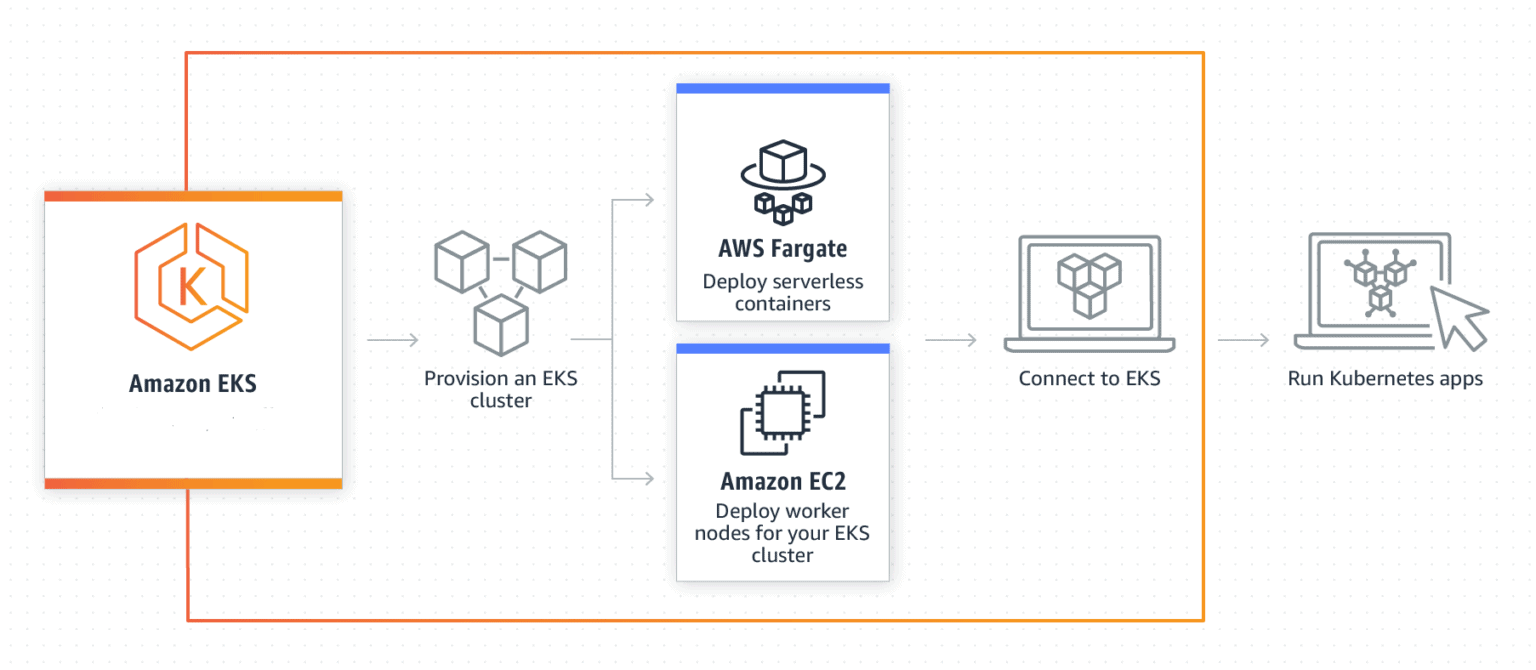
Amazon EKS workflow

Provision EKS cluster using AWS Console, AWS CLI, or one of the AWS SDKs.
Deploy worker nodes to the EKS cluster. There is already a predefined template that will automatically configure nodes.
Now we configure Kubernetes tools such as Kubectl to communicate with the Kubernetes cluster.
We are now all set to deploy an application on the Kubernetes cluster.
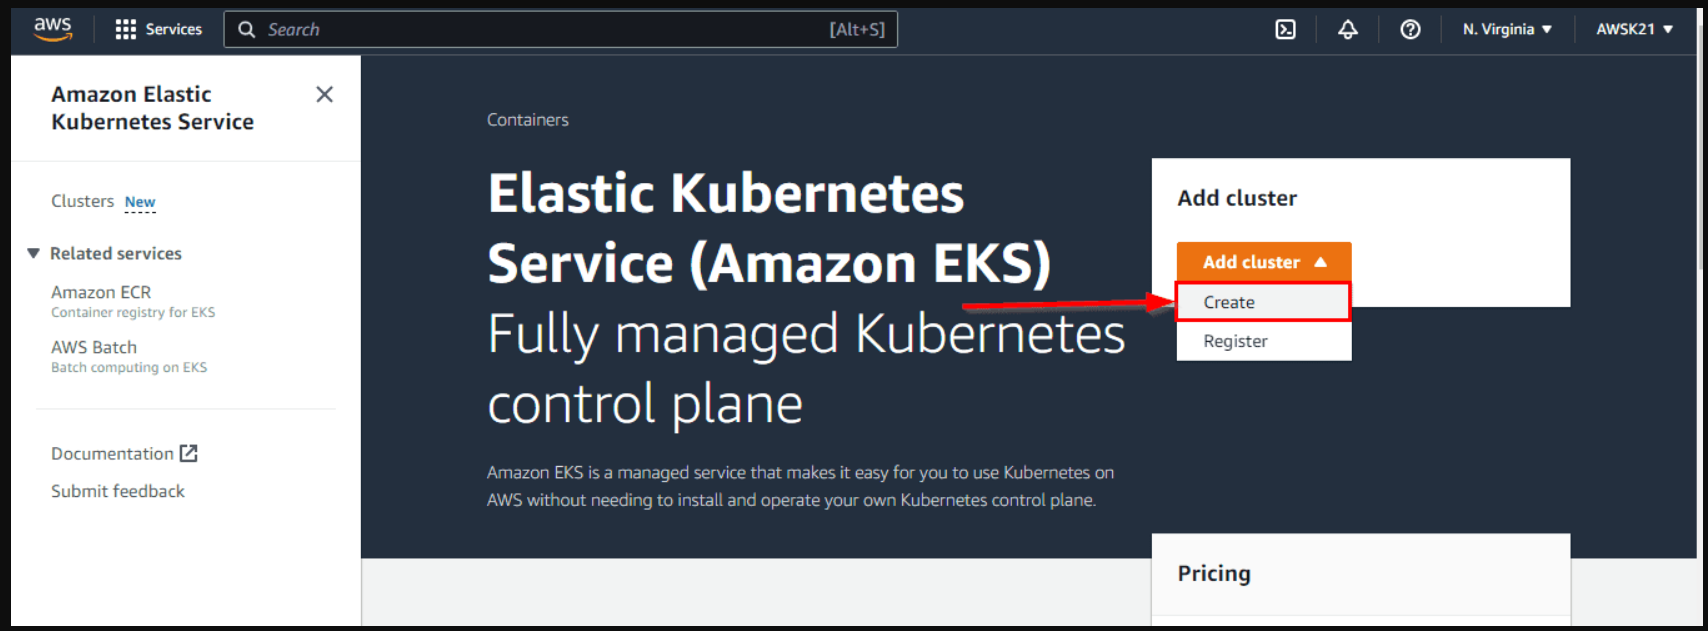
Create EKS Kubernetes Cluster Using GUI
Step 1: The very first thing is to create an AWS account. If you don't have an AWS free Tier account please refer - https://portal.aws.amazon.com/billing/signup#/start/email
Step 2: Next step is to Create a Master Node, follow the below steps to create one.
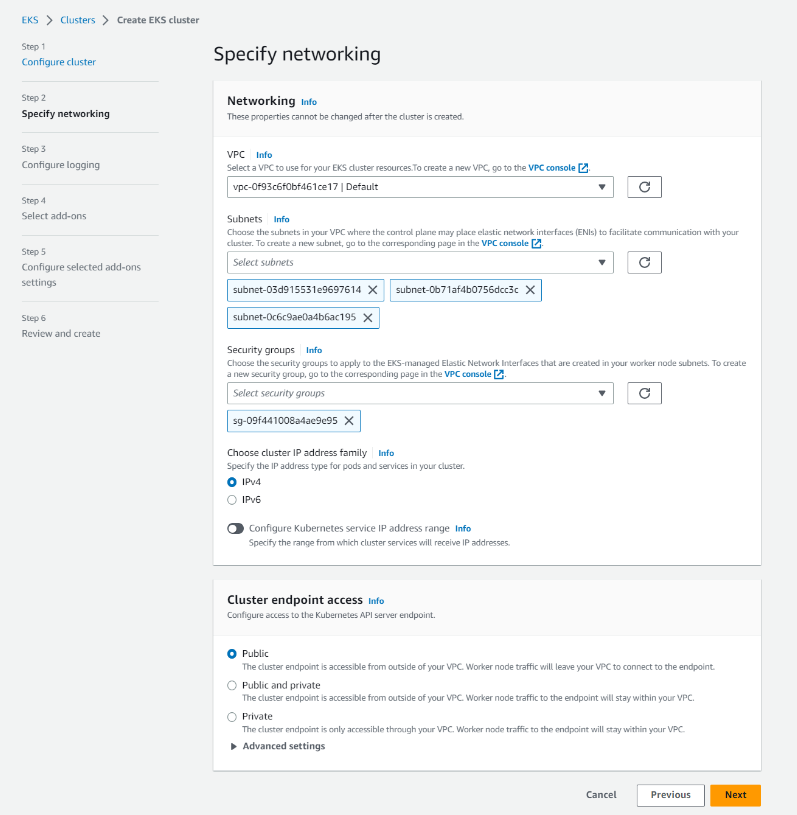
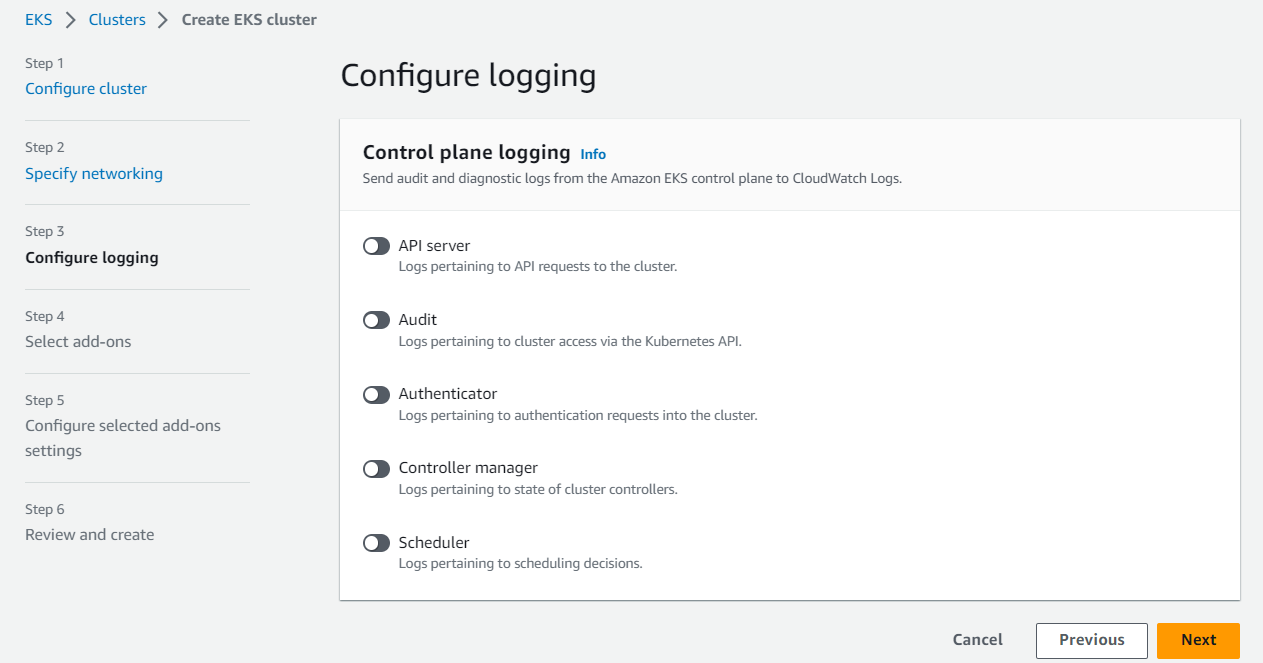
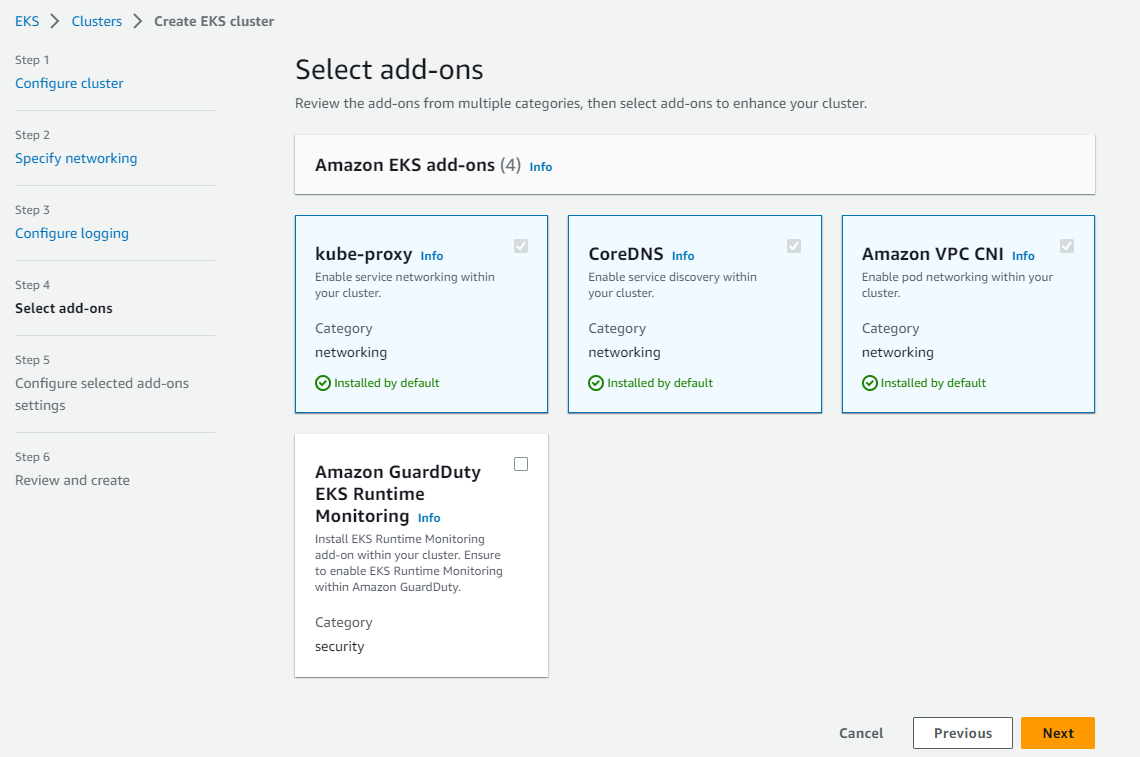
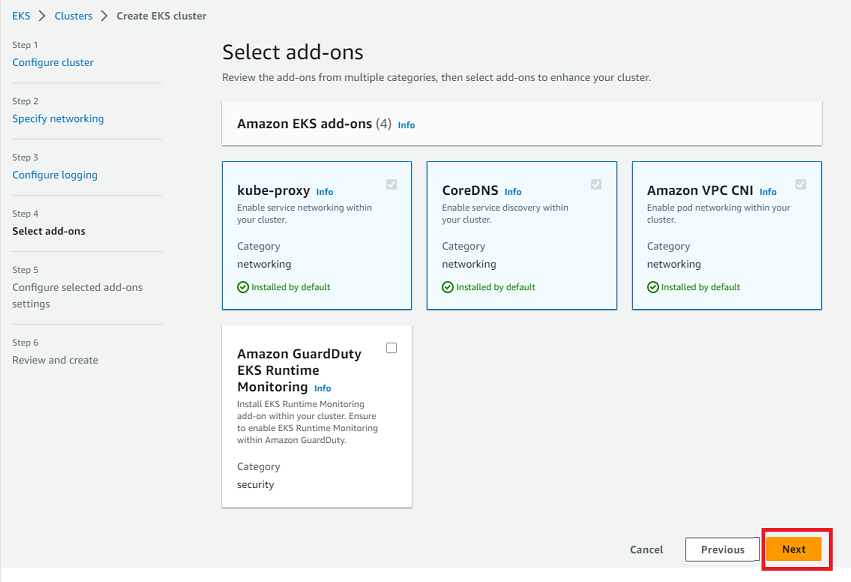
a) Log in AWS portal, find the Kubernetes Service by searching for EKS and click on Create Kubernetes Cluster and specify the name for the cluster.

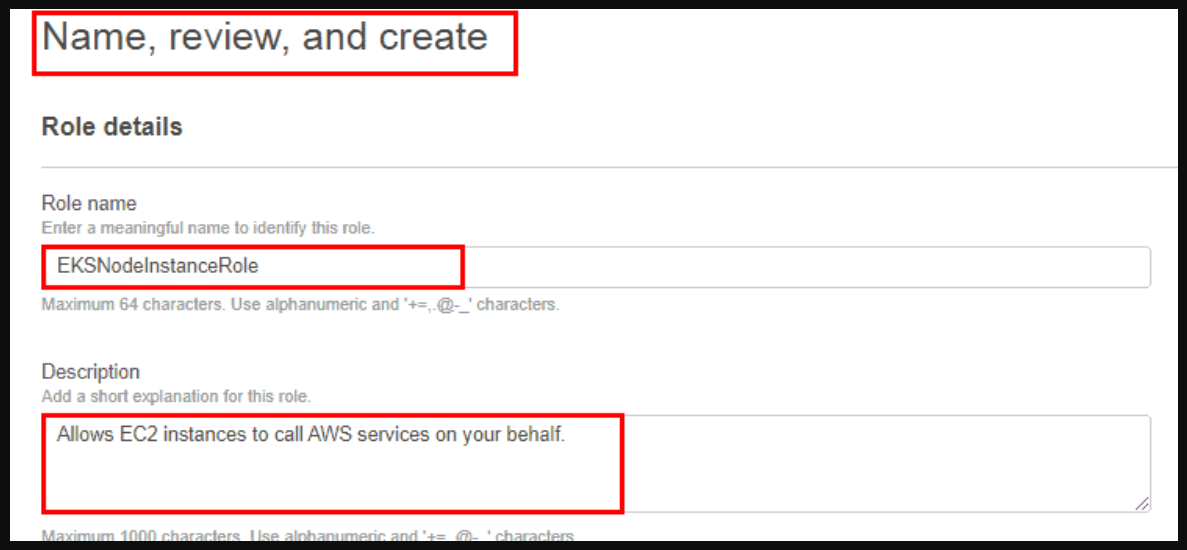
Here, Now we have to Create the New-Role; for that.
Navigate to the IAM service and click on "Roles"


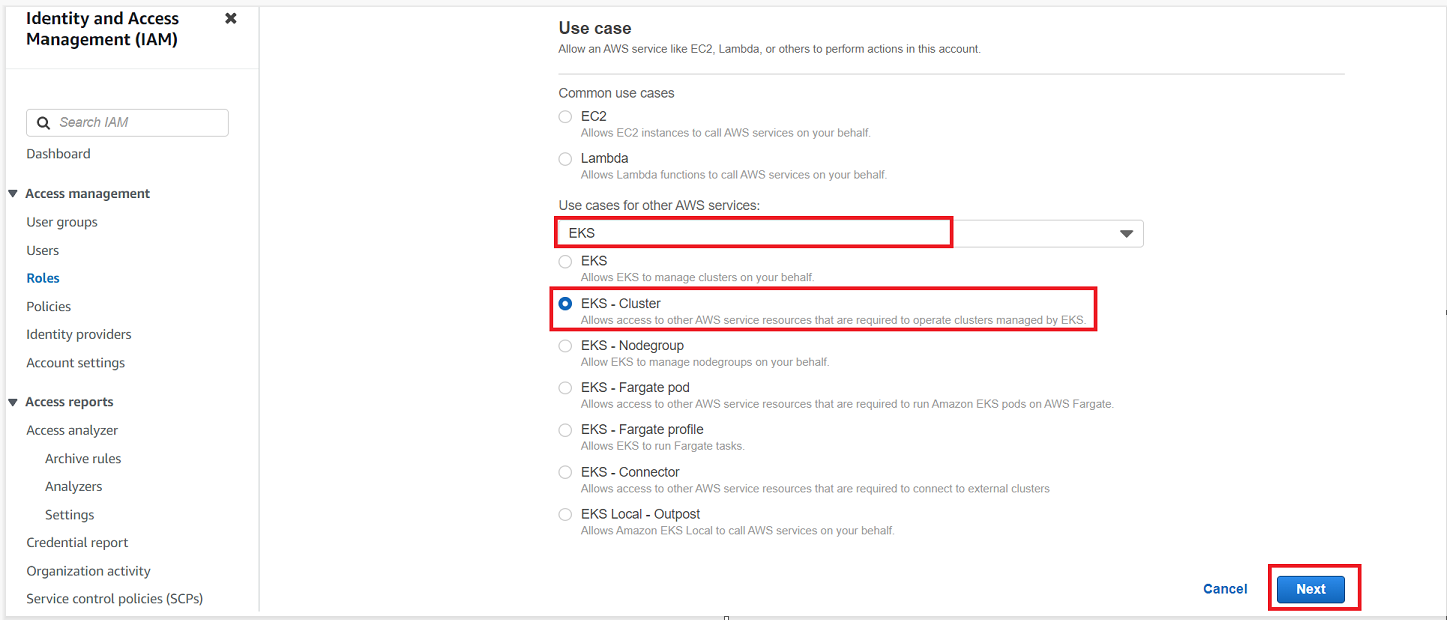


Now, the "Role" gets created..

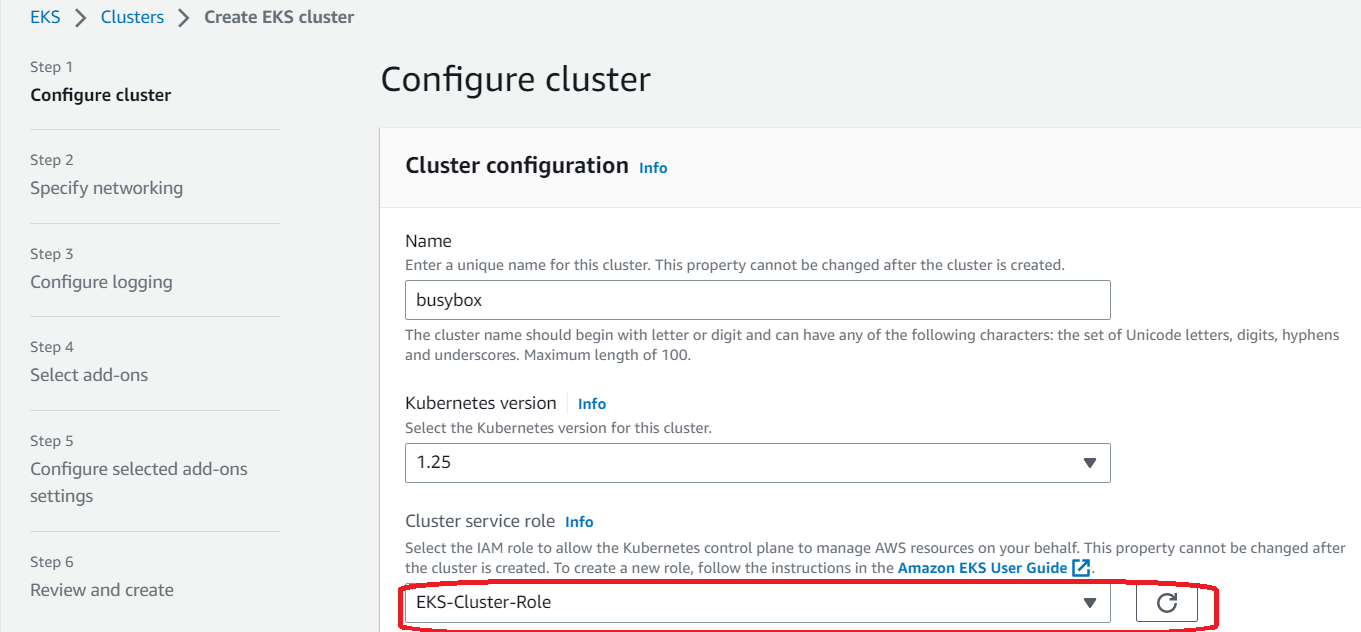


NOTE: Cluster Creation takes a duration min of 20mins.
Step 3: Next step is to Install & Configure AWS CLI on the EC2 instance. Follow the below links and steps for the same.
- To complete this step you need to create an Amazon Linux Instance first,
Create Access Key:
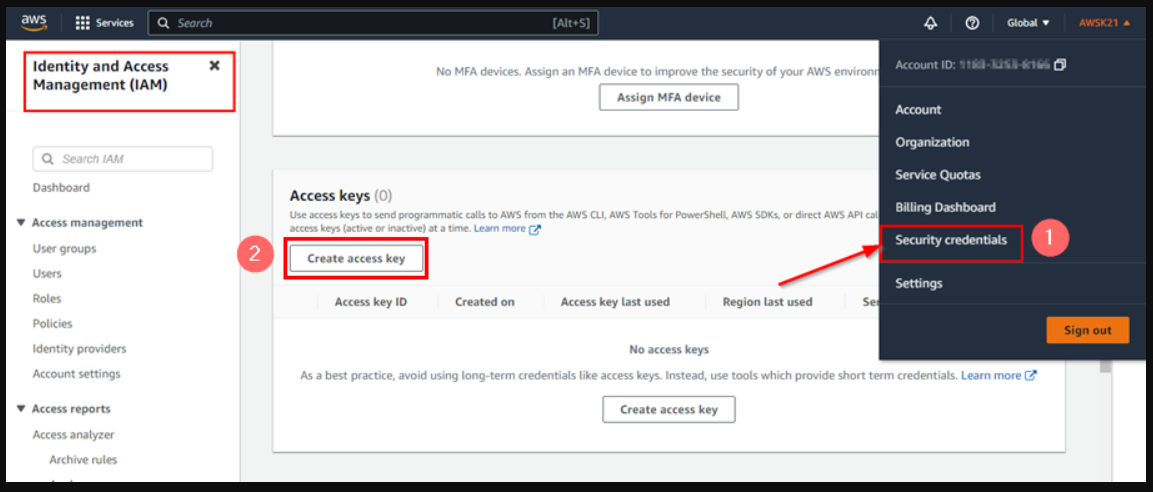
Configure your AWS CLI Credentials
The AWS CLI requires that you have AWS credentials configured in your environment. The aws configure command is the fastest way to set up your AWS CLI installation for general use.

To check the status of the cluster via CLI.
aws eks --region <region-name> describe-cluster --name <cluster-name> --query cluster.status

Step 4: Install and Configure kubectl
Install or update kubectl on Linux operating systems
curl -O https://s3.us-west-2.amazonaws.com/amazon-eks/1.25.7/2023-03-17/bin/linux/amd64/kubectl
Apply to execute permissions to the binary.
chmod +x ./kubectl
Copy the binary to a folder in your PATH. If you have already installed a version of kubectl, then we recommend creating a $HOME/bin/kubectl and ensuring that $HOME/bin comes first in your $PATH.
mkdir -p $HOME/bin && cp ./kubectl $HOME/bin/kubectl && export PATH=$PATH:$HOME/bin
Add the $HOME/bin path to your shell initialization file so that it is configured when you open a shell.
echo 'export PATH=$PATH:$HOME/bin' >> ~/.bashrS
After you install kubectl, you can verify its version.
kubectl version --short --client
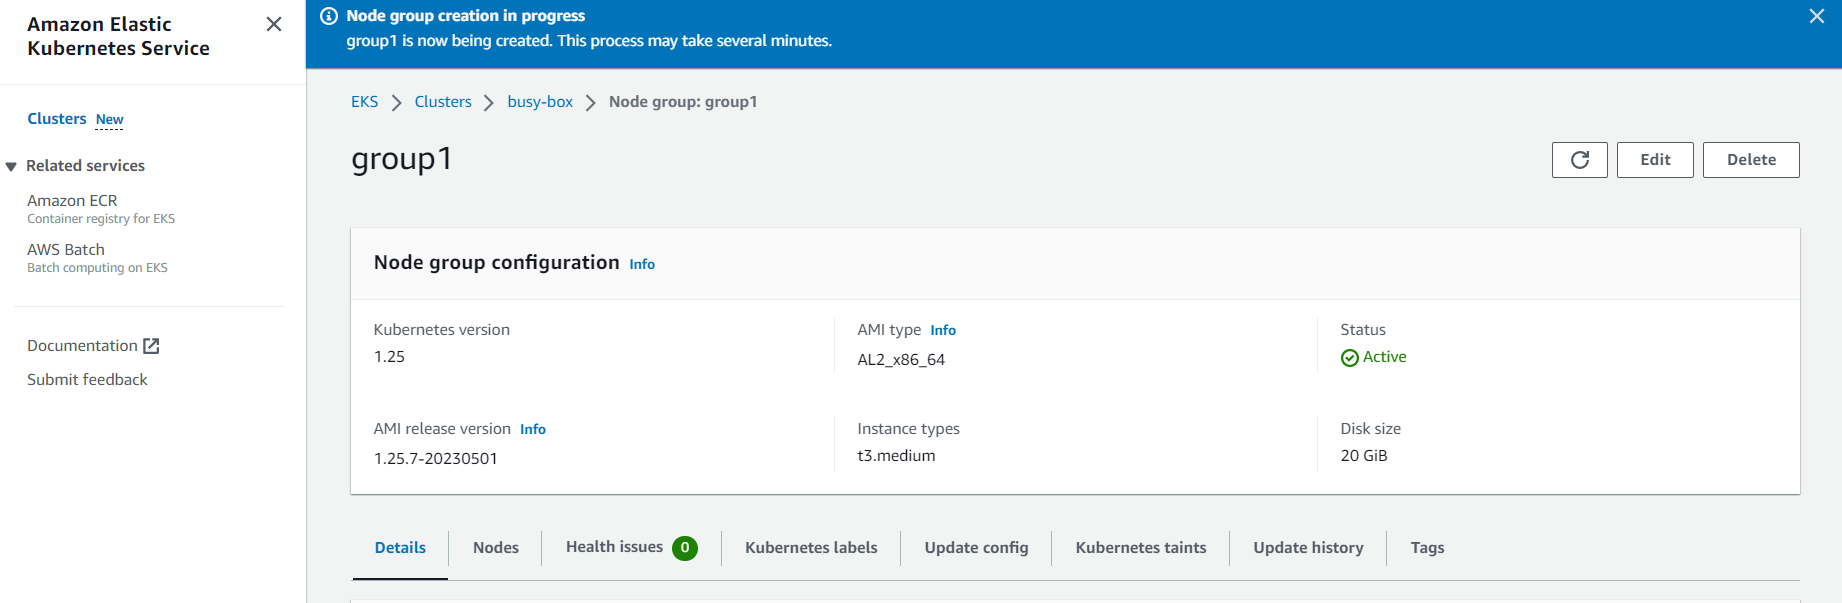
Step 5: The final step is to create the Worker-Node
a) On the Cluster page, select the compute tab and then choose to Add Node Group.
b) On the Configure node group page, fill out the parameters accordingly, and then choose next
Name - Enter a unique name for your managed node group
Node IAM role name - Choose the node instance role to use with your node group. For more information, see the Amazon EKS worker node IAM role.
Configure node group:
A node group is a group of EC2 instances that supply compute to your Amazon EKS cluster. You can add multiple node groups to your cluster.
First we go with creating the WorkerNode Group Role,
Step 6: Next is to configure the COmpute & Scaling of Worker Nodes.


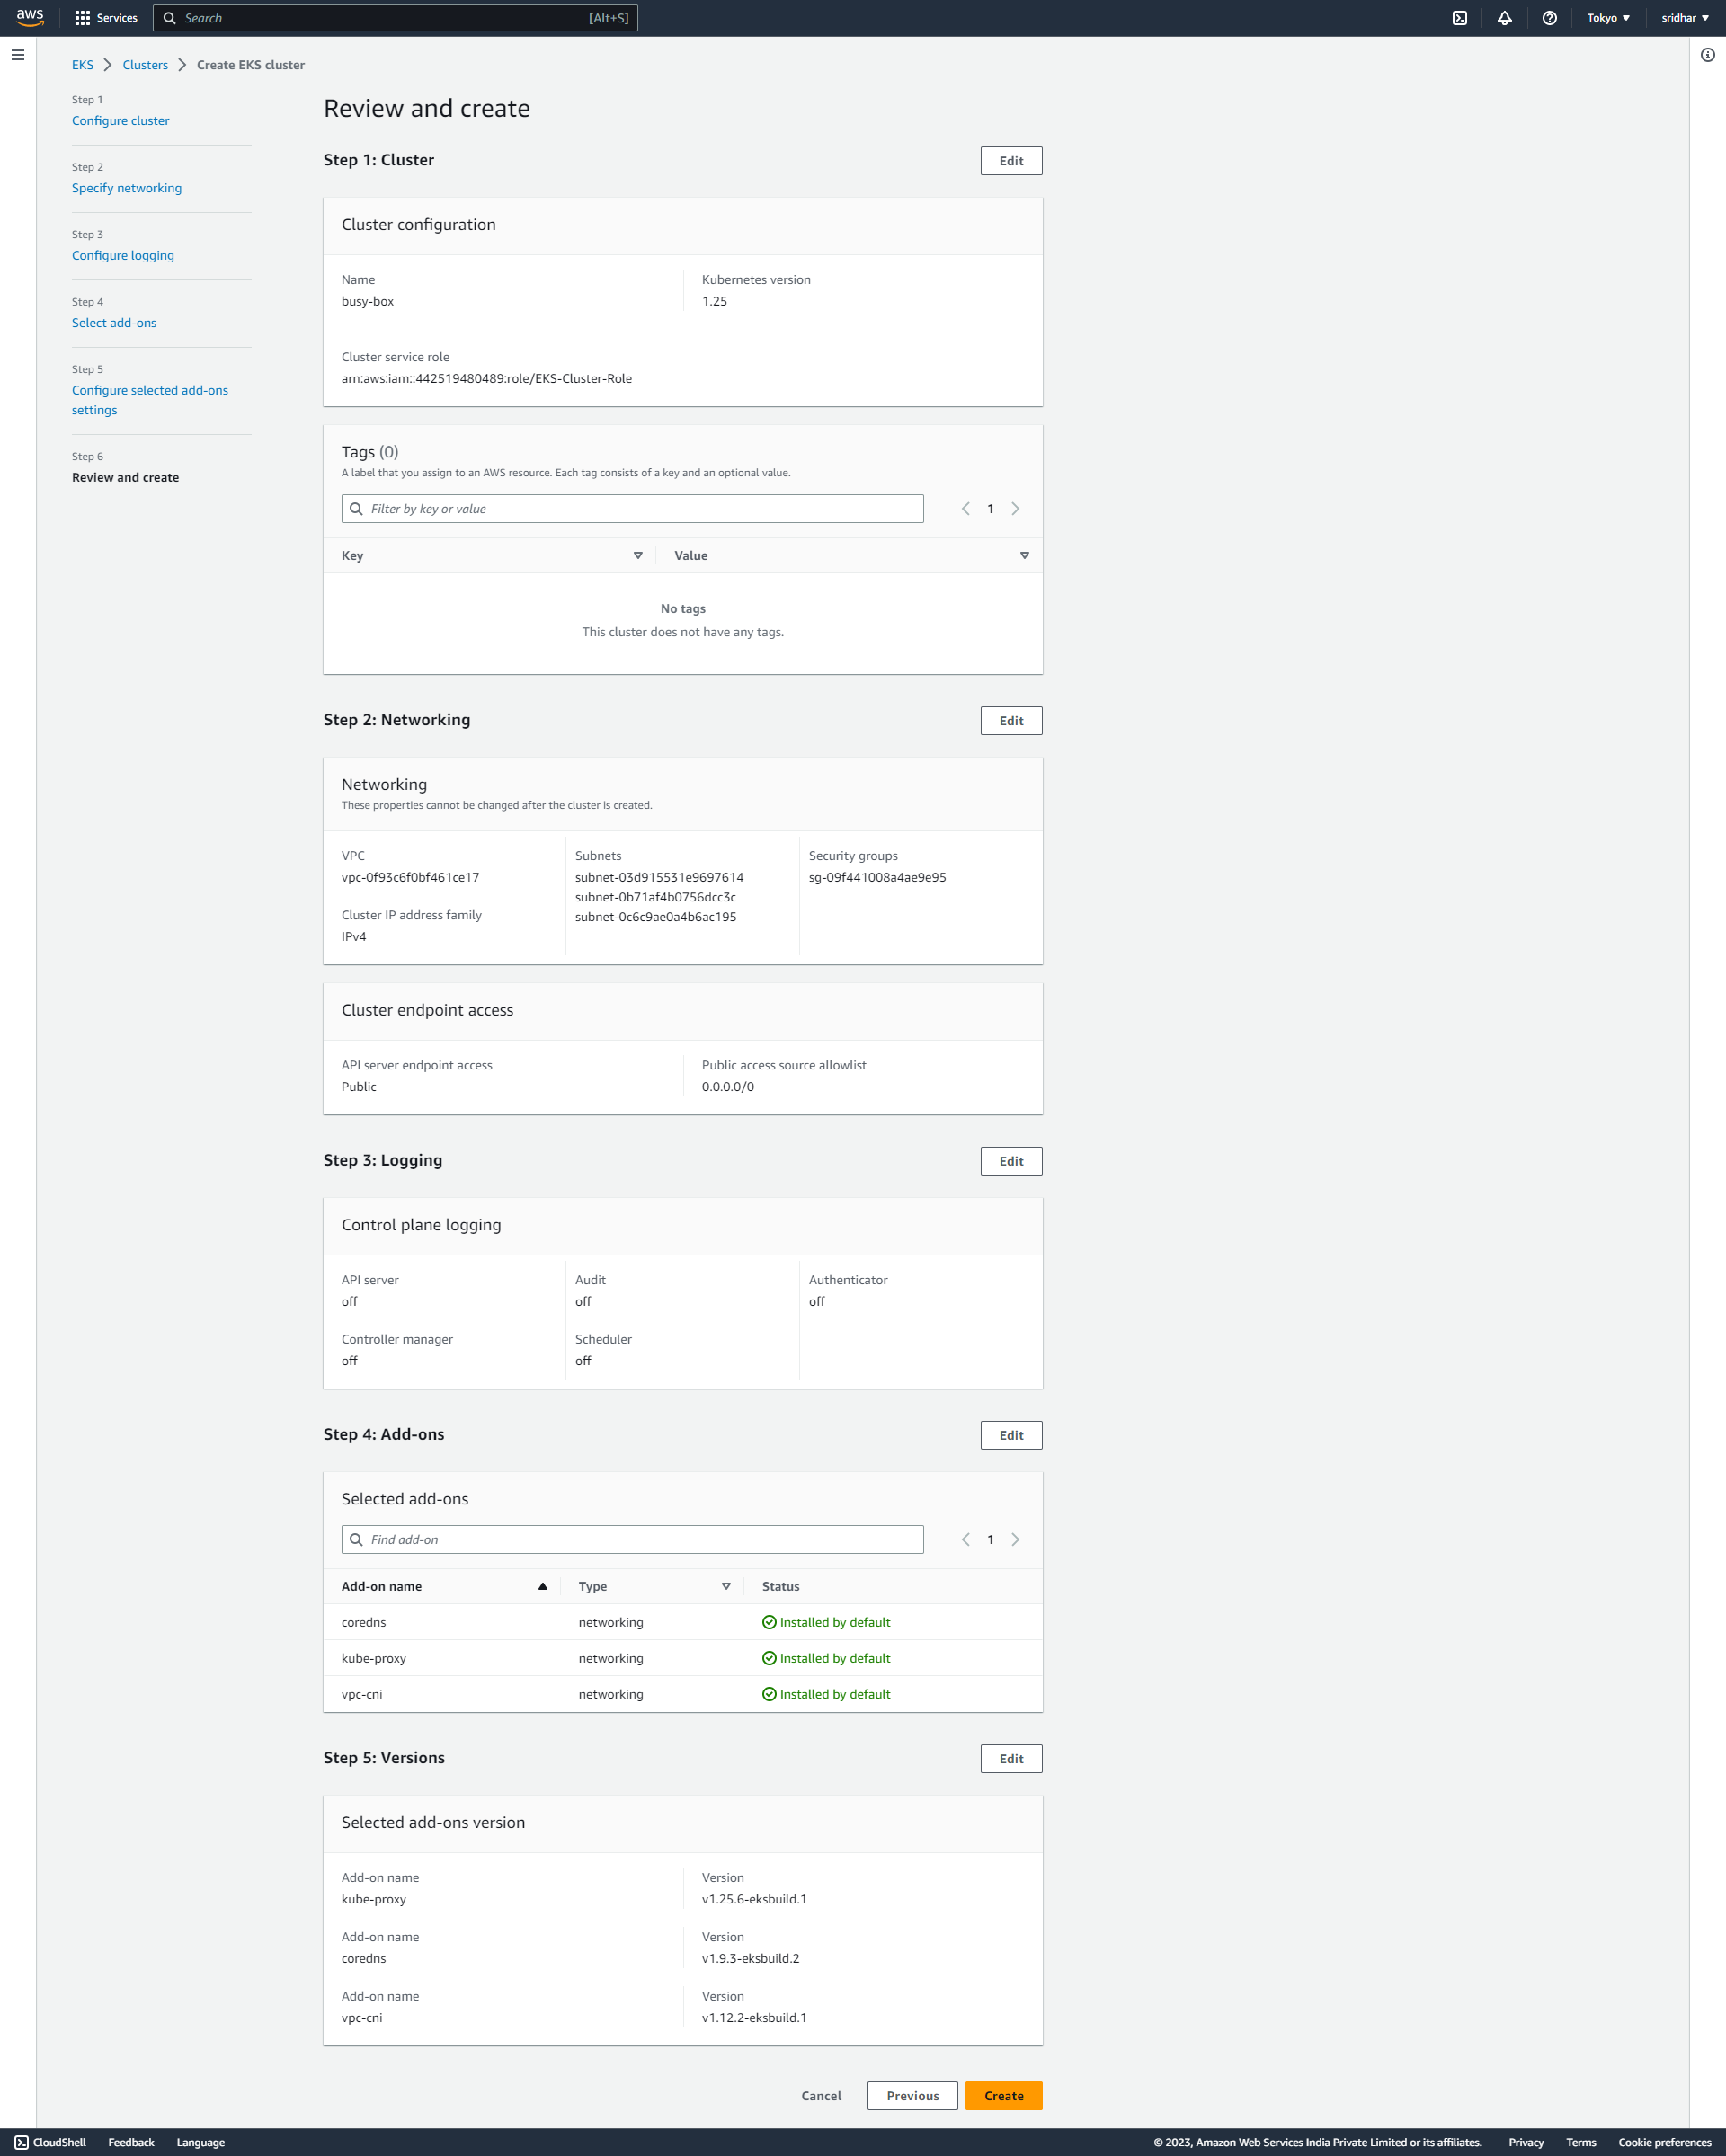
Review and Create;
Finally, we are done with creating the workerNoderGroup
Configure kubectl with EKS API Server Credential
aws eks --region <eks-region> update-kubeconfig --name <eks-cluster-name>

Step 7: The final step is to verify the Worker node status from Kubectl. For the same perform the given command:
kubectl get svc

kubectl get nodes

Finally, we are done with setting up the EKS cluster with the two worker nodes.
Now, write a Deployment file of Nginx server and deploy it on cluster;
Create an file with name nginx-deployment.yaml and give the below content,
apiVersion: apps/v1
kind: Deployment
metadata:
  name: nginx-deployment
spec:
  selector:
    matchLabels:
      app: nginx

  replicas: 2 # tells deployment to run 2 pods matching the template
  template:
    metadata:
      labels:
        app: nginx

    spec:
      containers:
      - name: nginx
        image: nginx:1.14.2
        ports:
        - containerPort: 80
Run command # kubectl apply -f nginx-deployment.yaml

To check the status of the pods, Run the command: # kubectl get pods

Please find here, some Kubernetes commands
\============x==============x================x================


